In the Netflix era, watching live TV seems to be old school, but you can’t always find every show or movie you want on a streaming service. Another option is to pay for cable or satellite TV. Who wants to do that?
If you are in a country/region that has terrestrial TV broadcasting, you can cut the cable and record live TV into a network DVR instead using Tvheadend, which runs on a Raspberry Pi. The operation method is as follows.
What is Tvheadend?
Tvheadend is a streaming server for live TV shows. It can handle streaming and recording over-the-air DVB-T/T2 broadcast TV, such as Freeview in the United Kingdom. It can also handle other forms of TV streaming, including cable (DVB-C), satellite (DVB-S and DVB-S2), ATSC and IPTV.
This guide will focus on how to use Tvheadend with DVB-T/T2 tuner for aerial terrestrial TV, but if you prefer to use Tvheadend to record TV from other input sources, many instructions for setting up Tvheadend will remain the same.
What are you going to do ‘ll need
To set up Tvheadend DVR, you will need the following:
Raspberry Pi 2, 3 or 3B+ with Case
MicroSD card with Raspbian installed
High quality power supply (5V @ 2.5A)
USB DVB-T/T2 tuner for OTA TV reception or Raspberry Pi TV HAT
One DVB-T/T2 antenna
Another PC for SSH connection and installed SSH client
The Raspberry Pi Foundation released Pi TV HAT that uses Raspberry Pi's GPIO pins to become a DVB-T2 receiver. If you don't have these devices, you can use a typical USB DVB-T/T2 tuner.
Step 1: Prepare Raspberry Pi
You need to install the operating system on the Raspberry Pi first; this guide will assume that you have flashed the latest version of Raspbian Lite to a microSD card and your Pi can connect to the Internet. It is also a good idea to run regular commands to update your Pi and change the default password on the first boot:
sudo apt update
sudo apt upgrade
passwd
If it is not installed, please flash the microSD card first and add a file named ssh (without file extension) to your boot partition. This will enable you to connect via SSH. You have to check the IP address of your Pi, you can use the network monitoring app on your smartphone to set it up.
Once you start the Pi, please plug the DVB-T/T2 tuner into your Pi (or attach it to the GPIO pin (if you are using HAT) and connect via SSH. Confirm that your USB tuner is working properly:
lsusb
Assuming yes, please check if the tuner firmware exists and load:
dmesg | tail | grep dvb
If the command returns nothing (or no error), it means that the DVB-T/T2 tuner is ready. If the log fragments returned by the command indicate that your firmware cannot be loaded, or the required firmware files are missing, you need to download them.
The Git repository media center distribution provided by the OpenELEC developers of Linux contains a large number of firmware files for various tuner chipsets. To install them on your Pi, run the following command on the terminal and restart:
sudo apt install git
git clone https://github.com/OpenELEC/dvb-firmware.git
cd dvb-firmware
. /install
sudo reboot Step 2: Install Tvheadend
To install Tvheadend and any other packages, type:
sudo apt install tvheadend
Type Y and press Enter to agree to the installation. At the beginning of the installation, you need to provide a username for Tvheadend for administrative access. Enter the appropriate username in it and press Enter.
You need to provide a password, so enter one in it and press Enter. The last menu provides information about what to do when installing Tvheadend to access the web interface on port 9981; just press Enter to continue the installation.
Step 3: Configure Tvheadend
After the installation is complete, open a web browser and go to http://YourIPAddress:9981, and replace the IP address with "YourIPAddress" for your Pi. Use the username and password you created during the installation process to gain access.

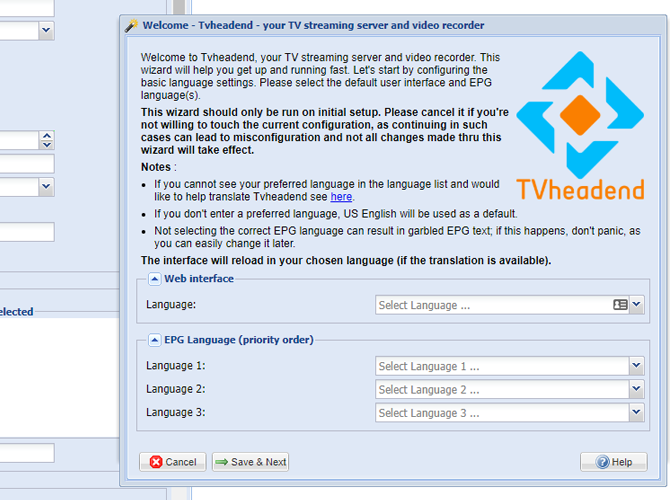
Select the language (electronic program guide, for TV) list) for the web interface and EPG, then click Save and Next.
In the next menu, unless you plan to allow access to Tvheadend outside the internal network, and assume that your IP address is in 192.168. .1.0/24 range, please enter 192.168.1.0/24 under allowed network. You can also provide other usernames and passwords for standard management and standard user accounts. Fill in the username and password parts as required, then click Save and Next.
The next step is to configure your tuner. Tvheadend should have detected your DVB-T/T2 tuner; for my configuration, it is listed under Network 2. Select the network type as DVB-T network. . Click Save again and continue in the next step.
Let your tuner scan the correct channel. In the next menu, you can select "Predefined Multiplexers", which are a list of appropriate frequencies to scan. Search for the list corresponding to your country and region in the list. When I lived in the UK, I used the BBC search tool to find the transmitter closest to my location.
After selecting a launcher, click Save and Next

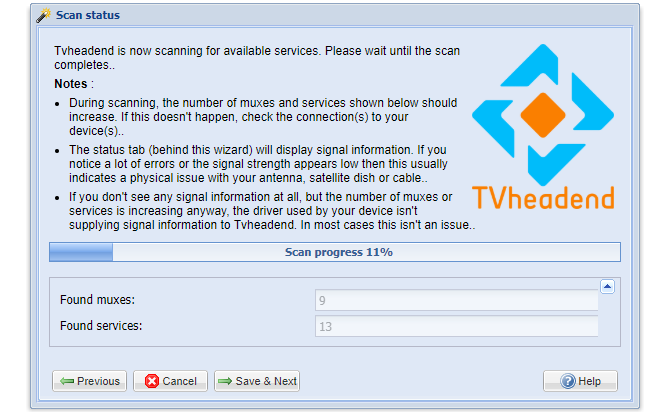
This will start scanning for channels operating at the frequency of the transmitter you selected. Let it run until the progress reaches 100%, then click Save and Next.
The next menu will have options to map these services to channel names that the media can understand. Players. Before clicking Save and before clicking and save, check the checkboxes to map all services, create a provider label, and create a network label. Next.
Once completed, your Tvheadend installation should be complete, with channels that match the services broadcast in your area. Just click Finish to close the configuration pop-up window.
Step 4: Streaming or recording TV
After installing and configuring Tvheadend, you can now move on to the interesting part-watching or recording TV. You can use Tvheadend to stream media players to media such as Kodi, use applications such as Tvhclient to stream to mobile phones or tablets, use VLC or stream to PC through Tvheadend's portal itself.
If you want to quickly load the channel into VLC for testing, please type the following in your web browser to download the playlist to be streamed, and replace it with your own username, password and IP address:
http://username:password@YourIPAddress:9981/playlist/channels
To record TV through the portal, search for content under the electronic program guide and click the first icon (with the "i" symbol) to display information about that information.

To record a show, select Record show. If you want to automatically record episodes of a TV series, select Record TV series.
Record and stream live TV throughout the home
Thanks to Tvheadend, you can save expensive TV and streaming packages. With Raspberry Pi, you can stream media content (whether live or pre-recorded) to all devices in your home, thereby permanently cutting the cable.
When the network DVR is ready, you can further expand your media ambitions, so please consider building your own media center PC to stream your favorite TV shows and movies (and without buffering). You can even build an Android TV box with Raspberry Pi to enjoy the benefits of popular Android-based streaming media applications.
Our other product:


