Outline
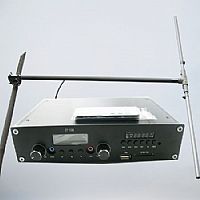
This is a small, but quite powerful FM transmitter, three with better audio modulated RF preamplifier stage. T has 4 watts of output power and 12-18 VDC, which makes it easy to carry.
Technical Specifications - Features
Modulation type :........ FM
Frequency range: ... ... 88-108 MHz of
Operating voltage: ... ... 12-18 VDC
:...... 450 mA maximum current
4 watts output power :............
How it works
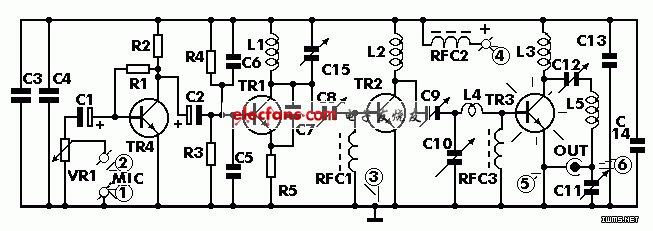
Because it has been referred to transmit FM signals (FM), which means that the carrier? The amplitude remains constant, its frequency according to the amplitude of the audio signal changes. When the growth rate of the input signal (ie, the positive half-cycle), the carrier frequency increases, the other hand, when the input signal amplitude decreases (negative half cycle or no signal), the carrier frequency is reduced accordingly. In Figure 1, you can see a graphical representation of frequency modulation, as it appears on the oscilloscope screen, the modulated audio signal. Transmitter output frequency from 88 to 108 MHz, which is the FM radio band is adjustable. As we have mentioned circuit consists of four stages. Three RF stages and one audio preamplifier for the modulation. The first stage is an RF oscillator and built around TR1. Control the oscillator frequency is determined by the LC network L1 - C15. C7 is there to ensure the continued adjustment of the oscillation circuit and C8 RF oscillator and a phase, which is a coupling between the amplifier. This is around the TR2 in Class C is adjusted by the L2 and C9. The last RF stage is built around TR3 working in a Class C amplifier input, which is adjusted by the C10 and L4. This is taken from the final stage, which is the L3 - C12 to adjust the output is the output signal through the tuned circuit L5 - C11 into the air.
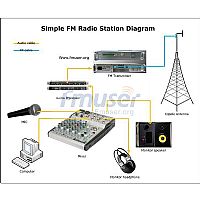
Preamplifier circuit is very simple, TR4 built around. Phase of the input sensitivity is adjustable to make it possible to use different input signal transmitter, depending on the setting of VR1. Because it is directly related to a piezoelectric microphone can be modulated transmitter, it is a small tape recorder, etc., of course, the results can be used to enter a more professional audio mixer.
Build
Let us first consider some of the basic construction of the electronic circuit printed circuit board. Pack a thin layer of conductive copper that is in such a way as to form a circuit between the various components necessary to form a thin conductive plate made of insulating material. A properly designed printed circuit board is ideal to use because of its speed of construction increased significantly, reducing the possibility of making mistakes. . In order to protect data stored on the oxidation of the Board, and ensure that it can be good for copper is in the production process, covered with a special varnish, to prevent oxidation, but also make welding easier. The components soldered to the board is the only way to build your circuit, it is largely from the way you depends on your success or failure. This work is not difficult if you insist on a number of rules, you should have no problem. You use the soldering iron, must be light, its power should not exceed 25 watts. Tip should be fine, at all times be kept clean. For this purpose come very handy, specially designed to keep moist sponge, wipe from time to time to remove all residues often accumulate on their hot tips. Do not file or sandpaper a dirty or worn tips. If the prompt does not clear, replace it. There are many different types of solder in the market, you should choose a good quality at its core that contains the necessary flow to ensure a perfect joint every time. Do not use flux addition, this is already included in the solder. Too much flux can cause many problems, is one of the main circuit failure. However, if you must use extra flux, as it is when you have the case of tin copper wires, clean it thoroughly, you finish your work. By welding components correctly, you should do the following:
- A small piece of sandpaper to clean the wire components
Bending them at the right distance from the component composition of the
You may find sometimes a component of total increase, resulting in thick than usual into the printed circuit board holes. In this case, the use of micro-drill a slightly enlarged
Hole - Do not make the holes too big, because it is difficult to weld
After - with hot iron and place on the tips of its component lead, and eventually took the lead solder holding the point of emergence from the plate. Tip must touch the lead slightly above the PC board. - When the solder begins to melt, flow to wait until it evenly covers the hole and the surrounding area and the flux boils from the following solder. The whole operation should not exceed 5 seconds. Remove the iron, so that the solder cool naturally without blowing or moving components. If everything is normal articular surface must have a bright metallic finish and its edges should be smoothly ended on the component lead and the board track. If the solder looks dull, cracked, or the shape of a blob then you have a dry joint, you should remove the solder (with a pump, or the tin - make sure you do not use more solder than it is necessary, because you are on the adjacent track circuit board running the risk, especially if they are very close - when you finish your cut off the excess component lead,
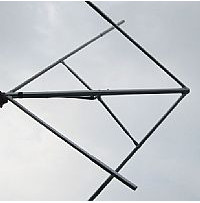
And thoroughly cleaned with an appropriate solvent to remove all flux residues that may still be the board of directors, which is a radio program and be more careful, which requires the construction period, the rush during soldering means low or no output, low stability and other issues . Make sure you follow the general rules of electronic circuit construction outlined above and carefully check all the next step. All components are clearly marked on the PC board assembly side, you should have no position, and their difficulties. Solder all the pins first, and continue to take care of the coil, no deformation, the RFC? S, resistors, capacitors and electrolytic and final cut. Ensure proper respect for their polarity and cut without overheating the welding electrolysis. At this point stop the work done so far a good test, if you are determined to see it all in their places and solder grate careful not to overheat, because they are the most sensitive of all groups using parts of the transistor project. Audio input 1 (ground) and 2 (signal), the power connection point 3 (-) and 4 (+) and the antenna connection points 5 (ground) and 6 (signal). As we have already mentioned that you use the transmitter modulation signal can be pre-amplifier or mixer output or in the case, you only want to modulation of voice, you can use the kit provided by the piezoelectric microphone. (The quality of this microphone is not very good, but it is quite adequate, if you are interested only in his speech.) As the antenna, you can use an open dipole or ground plane. Before you start using the transmitter or every time you change its operating frequency, you must follow the procedures described below which is called alignment.
Parts List
R1 = 220K
R2 = 4,7 K
R3 = R4 = 10K
R5 = 82 ohms
R = 150Ohm 1/2W X2 *
VR1 = 22K fine C1 = C2 = 4,7 uF 25V electrolytic capacitor of C3 = C13 = 4.7 nF ceramic C4 = C14 = 1nF ceramic C5 = C6 = 470pF ceramic C7 = 11pF ceramic C8 = 3 - 10pF C9 fine-tuning = C12 = 7 - 35pF tuning C10 = C11 = 10 - 60pF tuning C15 = 4 - 20pF tuning C16 = 22nF ceramic *
L1 = 4 turns silver wire 5,5 mm in diameter
The L2 = 6 turns in silver wire 5,5 mm diameter
The L3 = 3 turns silver wire 5,5 mm in diameter
The L4 = PCB
Printed L5 = 5 ring silver coated wire diameter 7,5 mm
RFC2 RFC1 = = RFC3 = VK200 RFC tsok TR1 = TR2 = 2N2219 NPN TR3 = 2N3553 NPN TR4 = BC547/BC548 NPN D1 = 1N4148 diode * MIC = Crystalic microphone Note: Parts marked with * are used to adjust the transmitter if Do you have VSWR bridge.
Adjustment
If you want your transmitter can provide at any time to ensure you get the best energy transfer between them, all you have to adjust the RF stage of its maximum output. There are two ways to do this, it depends on if you do not have a table or standing wave which is to follow. If you have a table open standing wave transmitter, connected to the output series antenna VSWR table, and open the C15 in order to cast you for your wide selection of frequency tuning oscillator. Then start to adjust the cut in this sequence C8, 9,10,12 and 11, until you get the maximum output power, in Bomi. For those who do not? Tons are in Bomi, there is another method, gives satisfactory results. You only need to build a small circuit in Fig. This is the transmitter put out in its output (across C16) you connect multi-tester, choose an appropriate scale volt connection. Adjust the desired frequency C15, then the adjustment in the same order as it is in the meter's maximum output cut above the other. The disadvantage of this approach is that you do not tie in with its output connected to a real antenna, transmitter and its antenna may require a perfect match to make up for slight adjustments to C11 and C12.
Do not forget to align your transmitter every time you change your aerial or your working frequency.
Warning: In each transmitter, with the exception of the main output frequency is usually a very short range of harmonics. To ensure your safe haven? Ton to do one of the adjustment, as much as possible from your receiver, or spectrum analyzer, see your output spectrum and make sure you properly adjusted your transmitter frequency.
Warning
If they are used as part of a larger conference, the damage caused, the Company does not undertake any responsibility. Although the use of parts, very careful handling power and equipment, safety standards, international standards and regulations.
Note
If it does not work
- Check your work, as dry as possible joints, track or in the adjacent flux residues will usually lead to
Problem of the bridge. Re-check all the circuits and external connections, to see if
There is an error - see any component is missing or inserted in the wrong place
- Ensure that all components have polarized the right way round welding
- Ensure the correct supply voltage, and the right way round to your circuit
Connections - Troubleshooting your project or damaged parts,
If everything checks and your project still does not work, please contact your retailer and intelligence support services for your service.
Electronic chart

Improvement of the original Dexing
Thomas [[email protected]] made some improvement on the original design:
Capacity of condenser microphones
Microphone preamplifier
External audio input jack, for example: the sound from the computer sound card transfer
A selector switch to select microphone or input jack
Printed circuit board re-design


零件补充:
C17(1UF)
C18(4uf7)
C19(4uf7)
C20(100nF的)
H1(13 * 13 * 10MM)
JACK1(立体声)
LED2(红色)
MIC(CAPACITIC)
R6(1M8)
R7(1K5)
R8(560K)
R9( 820R)
R10(4K7)
R11(4K7)
R12(1K)
R13(1K)
R14(2K2)
R15(680R)
TR5(BC547 BC548)
VR1(50K)
Our other product: